
Set up BuiltLauncher on a register
Install BuiltLauncher with the BuiltPOS Suite, set the kiosk sign-in, then create your PINs and choose the app that opens on start.
On this page
You set up BuiltLauncher once per register. You need a Windows administrator account on the register and about 15 minutes.
Part 1 — Install#
- Download the BuiltPOS Suite installer for Windows from the Downloads page on our website.
- Right-click the installer and choose Run as administrator.
- On the setup type list, choose POS Terminal (Launcher + POS only) or All apps (Launcher + POS + Office + API). Both include BuiltLauncher (kiosk shell).
- On the Kiosk Auto-Login page:
- Kiosk username: keep
Launcher-Kioskor type another plain local account name. Do not use an email address or aDOMAIN\nameaccount. - Kiosk password (leave blank to skip): type a password for that account. With a password, the register signs in by itself after every restart. Leave it blank only if someone will type the password at every start.
- Kiosk username: keep
- Finish the installer and restart the computer.
The installer creates the kiosk account if it does not exist and makes BuiltLauncher that account's screen. Your other Windows accounts keep the normal desktop.
It also switches on the kiosk lock-down. The lock-down applies to the whole computer, every account included: Task Manager, Windows locking (Win+L), changing the password from Ctrl+Alt+Delete, the Windows keys on the keyboard, and USB and CD autorun are switched off. An administrator who signs in as themselves still has no Task Manager. Uninstalling the BuiltPOS Suite removes the lock-down.
Part 2 — First start#
After the restart, Windows signs in as the kiosk account and BuiltLauncher shows BuiltLauncher Setup (4 steps).
- Create Admin PIN — type a PIN of 4 to 8 digits in Admin PIN (4 to 8 digits), then type it again in Confirm admin PIN. Tap Next.
- Manager PIN (optional) — type a manager PIN, or leave it blank and tap Next. The admin PIN also works anywhere a manager PIN is asked for.
- Merchant name — type your store name. It shows on the start screen and at the top of the tile grid. Tap Next.
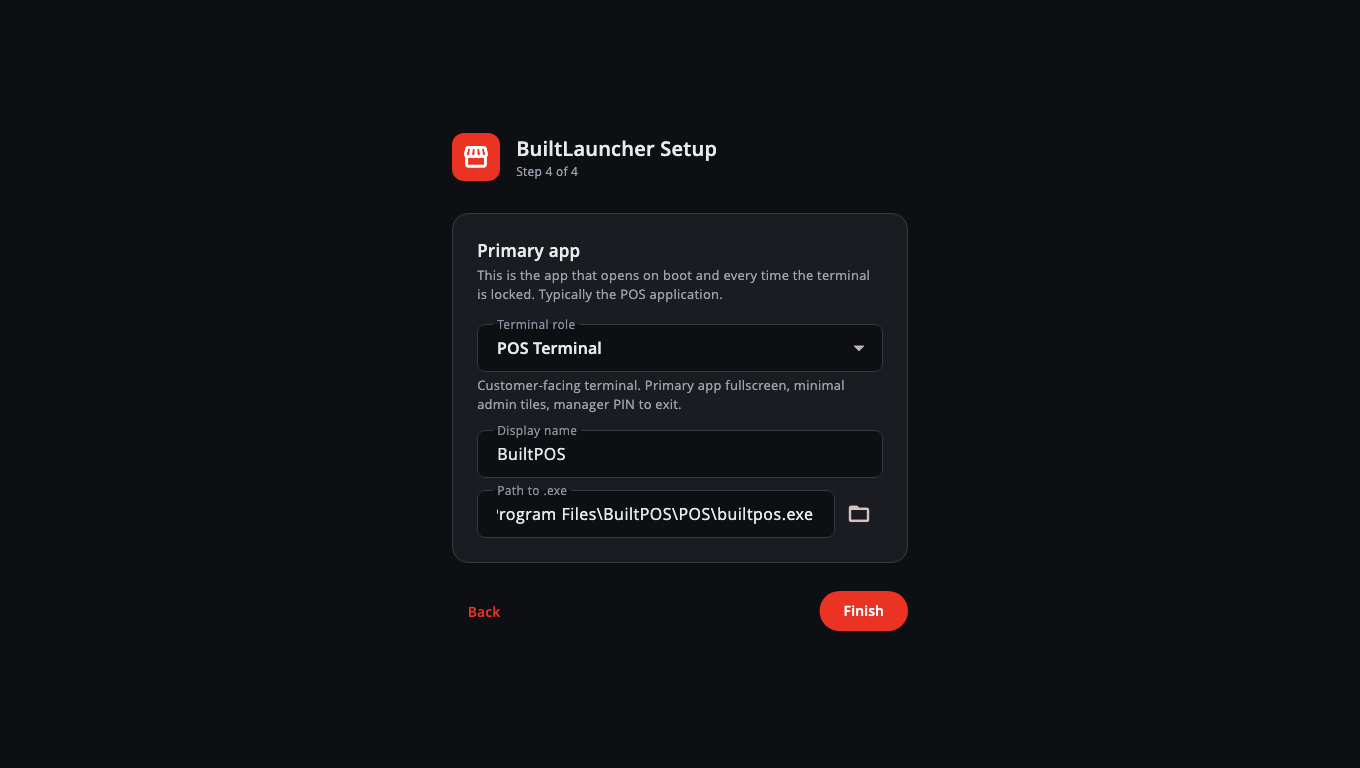
- Primary app — this is the app that opens on start:
- Terminal role: pick POS Terminal for a normal register. Other roles add extra empty tiles you can fill in later.
- Display name: for example
BuiltPOS. - Path to .exe: tap the folder button and pick BuiltPOS (normally in `C:\Program Files\BuiltPOS\POS`), or type the path.
- Tap Finish.
BuiltLauncher restarts itself and opens BuiltPOS.
Good to know#
- Write the admin PIN down somewhere safe. If it is lost, you need support to unlock the register (see Troubleshooting).
- The setup wizard only appears on a brand-new install. Once a register has been set up, it never asks again — a missing or damaged PIN file locks the launcher instead, so nobody at the counter can re-run setup.
- Roles other than POS Terminal add tiles with no program path yet. Fill them in from Admin Settings → Whitelisted Apps (see Add and arrange tiles).
- To change the kiosk password later, run the Suite installer again, choose Update the existing installation (keep current settings), and type the new password on the Kiosk Auto-Login page.
Was this helpful?
Thanks for letting us know.
Sorry it did not help. Tell us what was missing: open Help & Support in the app and choose Report a problem, or email support@builtsofthub.com.