
Connect BuiltSync to your SQL Server
Pick your SQL Server and POS database, choose SQL Server or Windows sign-in, test the connection, and finish setup.
This continues after you claim the agent. You are on the Database step of BuiltSync Setup.
Before you start#
Have ready:
- The SQL Server name (and instance name, if it has one — for example
SQLEXPRESS). - The POS database name (often
RetailPOS_DB). - A SQL login and password that can read that database. We recommend SQL Server Authentication — see "Which sign-in should I pick?" below.
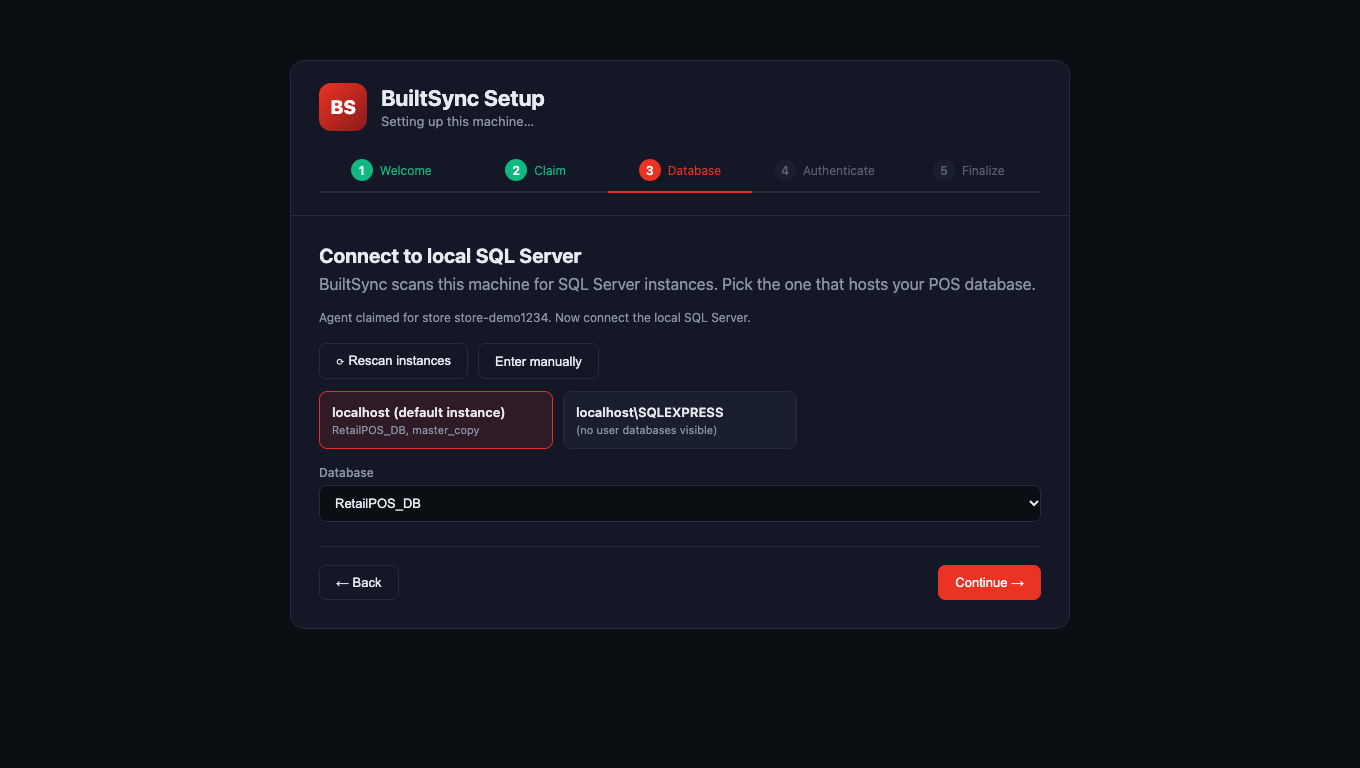
Step 3 — Database#
- BuiltSync scans the computer and shows the SQL Server instances it finds, with a few database names under each.
- Click the instance that holds your POS database.
- Pick the database in Database.
- Nothing found, or no databases listed? Click Enter manually and type Server, Instance (leave blank for the default instance), Port and Database. Leave Port blank for the usual port 1433. If your server listens on a fixed port of its own, leave Instance blank and type that port number. ⟳ Rescan instances looks again.
- Click Continue →.
Step 4 — Authenticate#
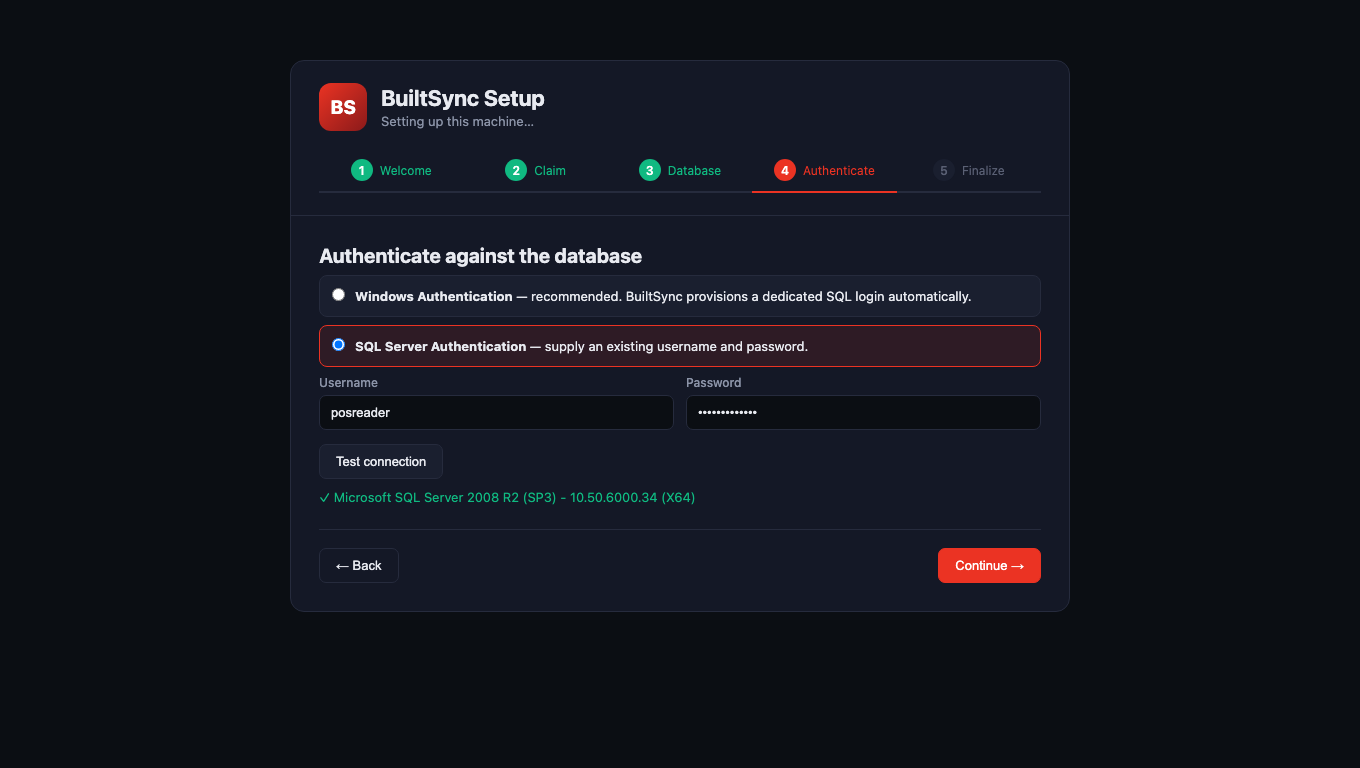
- Choose how BuiltSync signs in:
- SQL Server Authentication — type the Username and Password of an existing SQL login.
- Windows Authentication — BuiltSync creates its own SQL login for you (see below).
- Click Test connection.
- Wait for a green line starting with ✓. If it says "warning", read it — for example a missing table means this is probably not the POS database.
- Click Continue → (it only works after a passing test).
Step 5 — Finalize#
- Check the summary: Store, Server, Database, Auth.
- Leave Sync interval at 60 seconds unless support tells you otherwise.
- Make sure Install as Windows Service (starts automatically at boot, no login required) is ticked. The installer has usually set the service up already. In that case the box is ticked for you when BuiltSync runs as an administrator; otherwise tick it yourself.
- Click Finish and start syncing.
- You'll see BuiltSync is running, then the dashboard opens.
If something goes wrong, the reason shows on this step, under the checkbox. "Saved, but …" means your settings were kept but BuiltSync could not reach SQL Server. Fix it on the dashboard's Database page.
Which sign-in should I pick?#
SQL Server Authentication (recommended). Use a login that has db_datareader on the POS database (and db_datawriter too if support set your store up as Full). In SQL Server Management Studio: Security → Logins → the login → User Mapping → tick the POS database → tick db_datareader (and db_datawriter). sa also works.
Windows Authentication. BuiltSync uses the Windows account it runs as to create a login called builtsync_agent with the right access. This only works when:
- that Windows account is a sysadmin on the SQL Server — the BuiltSync service usually runs as the local system account, which often isn't;
- SQL Server allows SQL Server and Windows Authentication (Mixed Mode);
- the SQL Server command-line tools (sqlcmd) are installed.
If any of those is missing, Finish shows an error saying the login could not be created. Running the installer again does not help, because the login is created by the BuiltSync service's own Windows account (usually Local System). Make that account a SQL Server sysadmin, or switch to SQL Server Authentication.
Named instances (SERVER\INSTANCE)#
A named instance usually listens on a changing port. BuiltSync finds it through the SQL Server Browser service, so that service must be running. If it can't be found:
- Open SQL Server Configuration Manager → SQL Server Network Configuration → Protocols for your instance.
- Make sure TCP/IP is Enabled.
- Open TCP/IP → IP Addresses → IPAll. Clear TCP Dynamic Ports and set TCP Port to
1433(only if no other SQL Server on this computer uses 1433). - Restart the SQL Server service.
- In BuiltSync, click Enter manually, enter the Server, leave Instance blank, and type the port in Port (leave it blank if you chose 1433).
Good to know#
- SQL Server 2008 R2 and newer are supported, including older servers that only offer old encryption.
- The password is kept on this computer only.
- You can change these settings later on the dashboard's Database page.
Was this helpful?
Thanks for letting us know.
Sorry it did not help. Tell us what was missing: open Help & Support in the app and choose Report a problem, or email support@builtsofthub.com.