
Print barcode and shelf labels
Turn on label printing for the till, pick the label stock, and print one label or a whole queue, including on a Brother QL printer.
Before you start: turn on label printing#
Label printing is off on a new till.
- Open Store Management → This Till → Terminal Settings → Printer.
- Under Barcode / Label Printer, switch the printer on.
- Pick the Connection: Network (IP), System / Local Printer, Bluetooth or USB / Wired. For a Brother QL on Windows, choose System / Local Printer and select it from the list.
- Save.
If you skip this, printing a label shows "Label printing is turned off for this till" with a link to Terminal Settings.
Print labels#
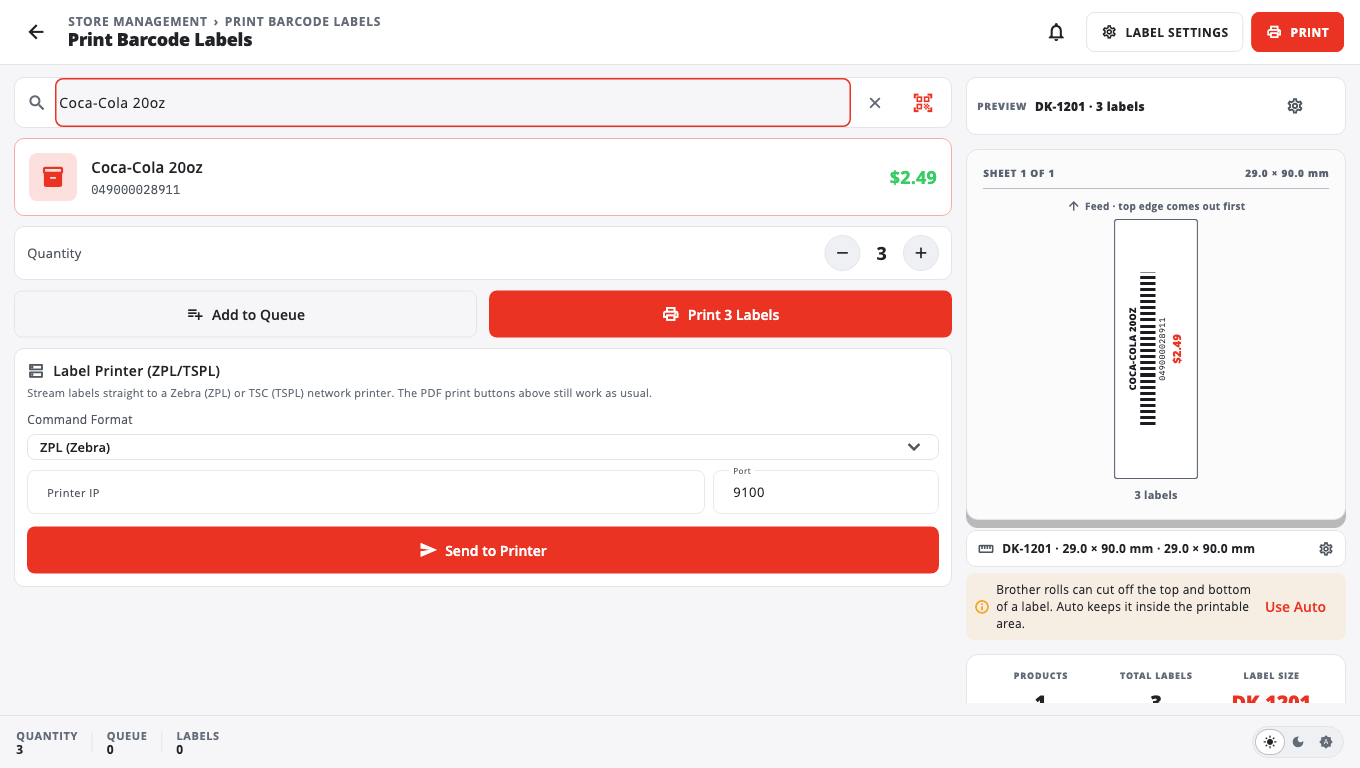
- Open Manager's Functions and tap Print Barcode Labels. This is a Store Management page: a Manager is asked for an Owner or Admin PIN.
- Search for the product by name or barcode (Search by product name or barcode...), or scan it.
- Set the Quantity.
- Check the PREVIEW. The line above it shows the label stock you are printing on. To change it, or anything else about the label, open Label settings (below).
- Tap Print 1 Label (or Print 3 Labels, and so on).
The labels print in the background. A strip shows Printing 3 / 10 — 30 % while it works, so you can search and queue the next product straight away. Leaving the page does not stop printing. When it finishes the strip says Printed 10 labels; if the printer refuses or doesn't answer it says how many were not printed, with Retry and Dismiss. Cancel stops the labels that have not started yet.
To print labels for several products at once, tap Add to Queue for each one, then Print All (… Labels). Clear Queue empties the list.
Label settings#
Tap the gear next to the preview (or Label settings in the top bar) to open Label settings. Everything about the label is on this one sheet:
- Label stock — a Brother DK rolls size, a Thermal labels size, or Custom size (width, length and feed direction). Detect from printer and Print test label are here too.
- Padding inside the label edge — Standard (the same space on every side as labels printed before), Auto (keeps everything inside the area the printer can really print; it asks the Windows printer driver, or uses safe margins for that roll), or Custom (0–15 mm on each side). On Brother rolls, which can cut off the top and bottom of a label, the page offers Use Auto.
- Barcode size — XS, S, M, L, XL or XXL. S is the default: small and easy to scan. M is the size labels printed at before. On a very narrow label the barcode is printed as wide as the label allows.
- Font size.
- Label Design (for example Name + Barcode + Price or Price only (big bold)), Show Barcode, Include Price, Include Product Name and Barcode Type.
Tap Done to close it.
Brother QL printers: the paper check#
On a Windows till with a System / Local Printer, BuiltPOS reads the paper the printer driver is set to before it prints.
- If it does not match the label stock you picked, you see a message like "Driver is set to …, but … is selected here."
- Tap Use DK-… to switch to the stock the driver is set to, Print to print as chosen, or Cancel.
- To check without printing, tap Detect from printer. Print test label prints one sample.
Zebra and TSC network printers#
Under Label Printer (ZPL/TSPL) on the same page, pick the Command Format (ZPL (Zebra) or TSPL (TSC)), enter the Printer IP and Port, and tap Send to Printer.
Good to know#
- You can also print a label right after adding a product: turn on Print barcode label after saving in Quick Add, or tap Print label in Quick Edit. See Quick Add and Quick Edit.
- A product with no barcode prints "No barcode". Add a barcode first.
- Label printing works in the Windows, iPad and Android apps.
- Labels sideways or cut off: see Brother QL label printers and Label printer problems.
Was this helpful?
Thanks for letting us know.
Sorry it did not help. Tell us what was missing: open Help & Support in the app and choose Report a problem, or email support@builtsofthub.com.